Definition of Artist

art·ist noun \ˈär-tist\


Definition of ARTIST

1

a obsolete : one skilled or versed in learned arts


b archaic : physician


c archaic : artisan 1

2

a : one who professes and practices an imaginative art


b : a person skilled in one of the fine arts

3

: a skilled performer; especially : artiste

4

: one who is adept at something artist> artist>


Wednesday, June 27, 2012

Something Better :)


Today I set out to do some journaling, but it turned in to something better.... WAY BETTER!  My wonderful husband fashioned me some nice wood blocks for painting out of some scrap lumber and it inspired me to do something a little different and I am tickled pink it did.

I started the day with the oil pastel landscape (last photo).  I had watched a nice video by Julie Balzer and thought I would give the technique a try.  I used colored pastels to lay down a nice and thick background.  (If you try this it is a WORK OUT especially if you own cheap pastels like me :) ) I drew a yellow circle for the sun and went from there with other colors.  Then I laid down some green for grass.  After laying down this extremely thick background I was tired and wore out, but driven to see if this technique would work.  So over top of my pretty colors I laid down an extremely thick coat of black oil pastel.  I completely covered the board.

Next, I laid down some stencils made with my cricut and the Stretch Your Imagination cartridge.  Then I began scratching off the black layer using a bamboo kabob skewer.  I scratch off all black except what was under my stencils.  And there you have it... easy peezy.  However, my shoulder is hating me right now.

At first I didn't like this piece, but the more I look at it the more I like it.  Point is.. sometimes we all create stuff we don't like.  That is part of being an artist.

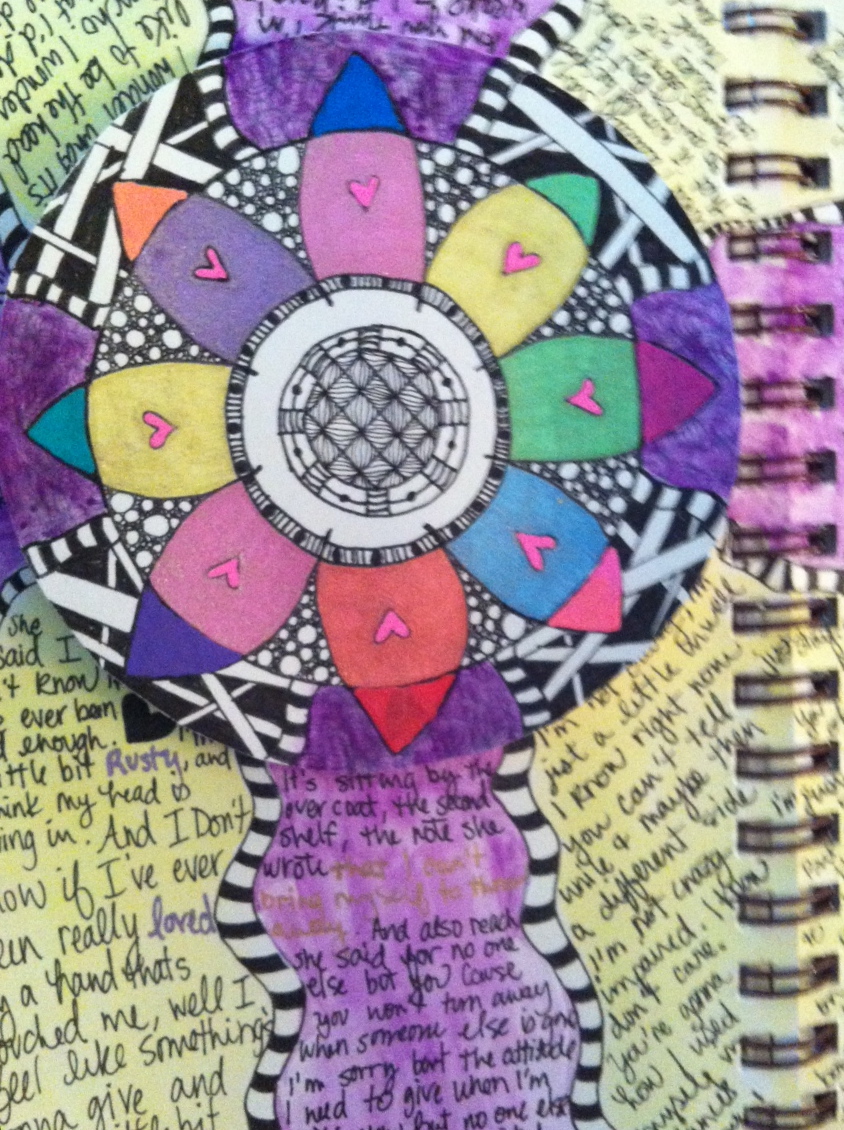
After working on the pastel peice, I worked on the mixed media piece (top photo) and it is my top favorite thing I have ever made.  I can't go in detail about how it was made because it all just kind of fell together.  I got into a zone and with a few constructive feedbacks from the hubs just went with my gut instinct.  However, I will tell you what all was used in the process.  I used some old scrapbook paper, glue, acrylic paint, gesso, stencils made with circut, pigma micron, stardust gelly rolls, old champagne flute, and tons of glitter paint.  The photo above really does not do this piece justice.  The actual thing has glitter everywhere accenting the trees, leaves, hummingbird, and background.

Since this is, in mine and my husband's eyes, the best thing I have ever created I would really like some feedback from you.  Do you love it??? Do you hate it??? Do you want to know more details on techniques used to create it?  Just shoot me a comment and I will get back to you asap... Hope you have had a Happy Hump Day... mine sure turned out to be something better than I thought it would.


Tuesday, June 26, 2012

What I Love About Me


Today's journal was inspired by some lovely scrapbook paper that I had purchased several years ago to make a scrapbook for my step-daughter's birthday.  I started by tearing strips of this paper and gluing it randomly on my page.  Then I mixed up some acrylics to match (without adding water) and used some very course brushes to apply it to the pages.  I used very little paint and basically scrubbed it onto the page.

Next I flipped through a few old magazines and found a lady with clothing that matched my colors.  I glued her down and used white acrylic to paint wings on her back.  I shaded around her and her wings with a charcoal pencil and blended it with my finger.  When flipping through the magazines I found the words: "what I love about me" and thought it was a great opportunity to jot down a few positive things about myself.  Often, as a women, I focus only the negatives.  I painted a small sheet of paper using colors that I had previously mixed and used an ink pad to distress the edges.  I journaled my thoughts and glued it down.

When I was gluing I remembered that I had a few matching stickers in my sticker portfolio so I dug them out and placed a few on my pages.  Then I used a stencil I made with the Cricut to place a few white fleur de lis on the page.  I hit them with the charcoal pencil and blended.  That's pretty much it.  I hope you enjoy.

My blog is fairly new and I very impressed with the number of visits so far.... However, not a lot of comments have been left.  SO here's the challenge.... LEAVE A COMMENT!!!  Do you like my blog?  Do you enjoy my pages?  Have you been inspired to create any art of your own?  Where are you from?  How long have you been journaling?  Do you have any art/ pages you would like to share? ANYTHING.... I am dying for some socialization :)  I hope to see what you post!  Thanks.

Monday, June 25, 2012

Supplies I Want... like yesterday :)


After a long weekend of browsing art journal blogs, videos, and surfing Blick Art Supplies I decided to do an entry about the supplies I am lusting after.  Over the years I have collected a ton of supplies and I would hate to know how much money I have wrapped up in it.  However, I hadn't really taken my art as seriously as I do now.  So the supplies I have collected are not all top quality... especially my acrylics.  Anyway, these are my top priorities for near future purchases.  Of course, these are not the only supplies I want... I am a junkie.  I have been addicted to art supplies my entire life.  :)

To begin these pages, I gave them a quick coat of black acrylic paint.  I misted a little water into it to make it nice and smooth.  While it was drying, I went through the Blick Catalog and cut out my desires.  It took me a while to narrow down my list to things I want the most.  

After all my cuts, I put some neon pink acrylic on the right page and scraped it with a credit card.  I just wanted to add a small block of color.  Then I used my finger to create the flower at the top of the left page.  I hit this with the dryer to prevent smears and outlined the finger flower with white paint just to embellish it a bit.

Next I tore some paper with bright pink color and moved it around until I found a layout that satisfied me.  Then I fooled around with the clippings until I was satisfied and glued them down using an adhesive runner making sure that I left a spot to title my page.  

I pulled out the trusty Moonlight gelly rolls and doodled my title, mixing in a few letter clippings from an old magazine, and some left over chipboard letters.  I added a few patterns to the word supplies and viola... done.  

Of course I had to go to the Blick site and add these to my wish list.  Not only is Blick the cheapest place I have found to buy supplies, but it provides an easy way to create lists.  I also appreciate that the site gives you a total for your list, excluding shipping.  I copied the total onto the strip of paper on the right hand page and journal: "It looks like I will be saving for a while".  Hopefully, I will hit the lottery soon and I won't have to save... I can just get what I want :)  Thanks again for reading my blog.... Hope to see some comments with reviews about these products or your wish lists... Happy Monday to you all!


Sunday, June 24, 2012

Anger Management using my Art Journal :)


Until now, I haven't written anything truly personal in my journal and thanks to being thoroughly pissed off at someone.... I went for it.  It was exhilarating and therapeutic nonetheless!  So here goes....  I started this page with a watercolor background.  I misted my pages well and just started spreading reds, blues, oranges, and purples.  I left a few white spots as well.  I knew I would cover this up so I wasn't particular in my painting.  I let my pages dry for a bit and hit them with the hair dryer to finish it off.

Once my pages were pretty dry I grabbed some bright acrylics (blue, red, and purple).  I mixed a little water into each color to dilute the paint a bit.  I did this so that some of the watercolor underneath would show through.  I very haphazardly added some blocks of acrylic color over my watercolor.  I did not cover the entire thing.... I just mindlessly added blocks of color, moving back and forth between each as I went.  Then I hit it with the dryer to speed up the drying process.  After it was dry enough I doodled around the bottom edge of both pages using a micron and a silver metallic gelly roll.

Next, I dove into my piles of scrapbook paper looking for patterns and colors that went with the paints on my pages.  I tore strips of paper and framed my pages with it, using my adhesive runner to adhere them to my pages.  I did not plan any of this... I just tore and laid it on my page to see where I wanted it to go.  I also cut some circles from scrap paper I had laying around and cut flowers from a pattern.  I used a Micron pen to doodle within the existing flower.  I felt it made it pop more.

Then I saw my Twilight Eclipse book on the table, tore out the Robert Frost poem, and burned the edges for an embellishment.  Warning the paper burns easily.... have a cup of water ready just in case of an accident!  I noticed in the table of contents that there was a chapter named Temper.  I should have remembered this since I have read each book of the series 4 times... YES- I am a Twilight fan :) and proud of it!  This gave me the theme for my page.... Anger.  It made all the sense in the world especially after becoming extremely peeved at someone the last couple of days.  So I decided to tear that page out as well.  I mixed up a little Gesso and water to make it more translucent and covered the page in that.  I set it to the side and let it dry.

While the page from the book dried, I drew a small doodle on the purple heading strip (right page at top) using a micron and moonlight gelly rolls.  Then I took my micron and wrote a message at the top.  The thin black ink did not stand out enough for me so I put a little gesso over it.  I hit it with gesso and used the dryer on it.  Then I used a Sharpie Fine Tip marker to re-write my message.

I then worked a bit at placing all of my book pages, text boxes, flowers, etc on my page.  I finally decided on a layout I liked and I glued everything down using my adhesive runner.  I took a step back and looked at what I had and decided what needed a little "umph" to pop more.  So I took a micron and went over the word Temper on the book page and wrote it twice underneath using different forms of my handwriting.  I used a bracket template (made with my cricut, poster board, and Wild Card cartridge) to outline my temper words.  I traced the template with a pen and then colored it in with black oil pastel.

Next I wrote: * Count to 10 and breathe and added some scrap zebra ribbon underneath.  Then I journaled a message on the text box I had previously made.  It reads:  I'm going to have to learn to control my anger..."  In the box on the right hand page I wrote: "Instead of letting my anger control me." Then I doodled the word breathe using lettering from Joann Fink's book Zenspirations.  It is an excellent book and I would highly recommend it for anyone who enjoys doodling, patterning, and lettering.  Finally I used a white gelly roll pen to decorate blue (painter's) masking tape.

I hope you enjoy these pages as much as I did making them.  I will definitely be writing more and adding more personal messages on my pages... the reward was great.  I am way less pissed now :) .  

Saturday, June 23, 2012

I have one Happy Kat :)


My first acrylic portrait... I know it's of an animal, but I am still proud!  Happy Kat, that is her name, came into my life September 2, 2009.  My hubby gave her to me as an anniversary gift and it was love at first sight.  Even though I have 2 mastiffs and 1 other cat, Happy is MY baby.  We have a special connection, so I thought it would be great to allow her to be a muse for my daily journal pages. Especially since she killed a lizard that had entered my house this week :).  My favorite photo of her is above and is very dear to my heart.  Feeling a little brave I decided to try to paint her in my journal.

I drew the outline of her shape using a Sakura Pigma Micron pen because it is waterproof.  I then mixed a various shade of gray on my palette and began painting, using the photo as a reference.  After she was finished, I mixed 1 part black acrylic paint with 1 part water.  I added a small drop of glitter paint to the mix and stirred until I had watercolor consistency (adding paint or water until I was satisfied).  I also did this with my lightest gray color.  I painted the light around Happy and the black color all over the rest of my pages.  I hit this with the hair dryer for a minute so It would dry quickly.

Once dry, I used a swirl template that I had previously made using poster board, my cricut expression, and my Wild Card cartridge to make the white swirlies on the background.  I colored them with a white Souffle pen because I like the raised ink.  Then I used a #1 Graphic Pigma Pen to write about Happy Kat on the left hand page.

I really enjoyed making this page..... and as I created Happy laid beside me and watched.  If you have any questions about technique, please comment below.  I hope you enjoy it as much as I did making it! Happy Saturday!

Friday, June 22, 2012

Acrylic and Watercolor Bird Journal Pages


This morning I watched part of a Bush concert on television.  I really enjoy some of Bush's songs, like Glycerine and Come Down.  Given that Gavin Rossdale is their lead singer, I listened to some songs I don't really care for.  During this time, I reflected back to the 90's and when I was in love with Nirvana.  The song plateau entered my mind and I haven't been able to shake the only few lines of the song I know.  So I figured why not and decided to let Nirvana be my muse for the day.  

I had been wanting to try scraping acrylic paints with an old credit card after getting the idea off of a YouTube video.  This is how I created the background of my page. To begin I sprayed my pages with a little water and a small misting bottle (the kind you find in the travel section at Wal-Mart) and applied black paint straight from the tube to both pages.  I then took my card and pushed the paint around. Once I got the black the way I wanted it, I applied Calypso Blue directly to the page and scraped it around.  I set my pages to the side to dry.  

While my pages were drying, I cut the little birds using my Cricut Expression machine, which I should add, is an excellent tool to have on hand.  I had the birds cut in less than 3 minutes!  Then I hand cut the leaves and flowers from scrap paper left from cutting the birds.  Then I hit my journal pages with an old hairdryer because I don't have a heat gun.  

After my pages were dry I gesso'd the tree onto my pages.  I added a little water to my gesso to make sure that it would be pretty translucent.  That dried fairly quickly because I used such a thin coat.  I then used a watercolor pencil to color over the gesso.  I was not neat in my application.  Using my water brush from my Koi set, I applied water over the coloring.  I was really impressed with the texture that the gesso gave my tree.  I am not sure if you can see the texture in my photos, but it is there.  Then I glued my leaves, birds, and flowers down using my Xyron 1.5 inch sticker machine.  The lyrics to the song are written in yellow, orange,  and purple Sakura Souffle pens (because I like the raised ink) and  a white Gelly Roll pen.  

To top this page off, I decided to create a mandala.  I used tanglepatterns.com to find tangles to use in my mandala.  I attached this to my journal using a paperclip.  There you have it... easy as pie!
If you have any question regarding techniques, products used, or opinions please comment below.  My blog is extremely new and so far I have had no feedback... so please let me know what you think! Thanks a bunch.


Wednesday, June 20, 2012

Watercolor Resist with Crayons


After watching a YouTube video about watercolor resist techniques, I was inspired to use some of what I learned in my journal today.   I was also inspired by a great lettering video by Julie Fei-Fan Balzer. I began this page by writing my name in mixed letters (found in the middle photo).  I then used a variety of Sakura pens (Moonlights, stardust, souffle, micron) to trace and color each letter.  If you watch the lettering video, you will notice that you can take a water brush to your Stardust pens to blend them.  This needs to be done quickly before the ink dries. I completed my name, drew the bird, stamped the cat,  and found my trusty white crayon... I have always wondered why they even make a white crayon, but now I know :)... I used the crayon to draw designs on the edges of my pages.  I tilted my paper in the light so I could see what I was drawing.  I then grabbed my Koi watercolor set and mixed up blue and green on my palette.  I painted over the crayon in a sloppy manner with blue, then filled in the rest with green.  After my paint dried, I hand wrote my favorite quote and  browsed some magazines for clippings of things I like.  I then decided to cut out each letter of my name and write an adjective for each letter.  The words I chose are words that I feel describe me.  There you have it.... my journal pages for the day!  I hope you enjoy them... maybe you are inspired to do some resist techniques yourself!

Matchbox 20 Inspired Journal Pages


Yesterday morning I decided to watch a Matchbox 20 concert that I had previously recorded on my DVR.  What would we do without DVR?!?  In fact, I can’t imagine my life without this luxury... I definitely watch entirely too much tv :).  None the less, I have been a Matchbox fan since the late 90’s, and I was truly inspired by the band.  I can honestly say that I enjoy the lyrics to every song they have released and after listening to their unique arrangement of 3 AM, I decided to use the band as a muse for my daily journal pages.  
Another passion of mine is Zentangle, although I am NOT a CZT (certified zentangle teacher).  However, I do plan to be within the next few years.  A Master’s Degree, that I am forced to start for my job, stands in my way.  When browsing Yellow Daisy’s blog I noticed a beautiful Compass Mandala ( a circular zentangle), which was my other inspiration for this page.  So I walked into my newly created craft room and cut a circle of bristol paper, my favorite for zentangle, and began working. 
The truly beautiful thing about Zentangle is there are NO mistakes.  Pencil is only used for the “string”, which is drawn to split your paper into smaller sections for patterning.  In Zentangle, every pattern is created one stroke at a time, and in the process of creation can be extraordinarily relaxing.  When I am tangling, I enter sort of a trance, where the only things on my mind are the strokes of my favorite Sakura Micron on my fresh, white paper.  About 4 years ago I was diagnosed with Fibromyalgia and was instructed by my doc that I needed to slow down- take a little time to myself each day.  I am an extremely high strung Virgo, who battles with stress (mostly self- induced) on a daily basis.  I have tried several types of things to help me relax: manicures, pedicures, massage, etc.  However, they are all very expensive and I cannot afford to do them on a daily basis, or even a monthly basis.  A few months ago, I stumbled upon Zentangle while reading Joann Fink’s book Zenspirations, which I recommend that you read if you enjoy lettering in anyway.  I decided to do a little Internet research and thought it looked fun.  Ever since creating my first Zentangle I have been addicted.  I spend at least 45 minutes a day creating Zentangles, and it has provided me a way to escape my racing mind for at least a while anyway.  
Back to these pages.... After creating my Mandala, I decided to stick it in my journal using a foam adhesive strip (the kind that raises stuff off the page).  Upon deciding the perfect placement for my mandala, it dawned on me that it would be cool to extend the mandala on to the pages of my journal.  So that is what I did.  I then saw my Sakura Koi Watercolor kit setting on my desk and decided to go for it.  I painted each section created by the extensions of my mandala.  I immediately went to purple, one of my favorite colors in the kit, and asked the hubby to choose the second color.  Hence, the yellow.  I laid my pages to the side and let them dry.  
With the songs from the concert watched still in my head, I thought it would be a good idea to fill in each section on my pages with Matchbox lyrics.  So I “googled” Matchbox 20 song lyrics and found a site that had lyrics to every song!  I went through my favorites by selecting the parts of each song that are my favorite and hand wrote them on my pages using a Sakura Micron pen.  And there you have it... these pages were done.  The color on my Mandala was created using Sakura Stardust Pens and Sakura Moonlight Gelly Rolls. If you don’t have a set of these pens, I strongly suggest you save up to purchase them!  They are amazing!

Watercolor Fascination


Among many other things, watercolor has become one of my recent fascinations. I was inspired by my Sakura Koi watercolor set.  This set is truly exquisite in that it is very portable, contains a water brush, a nice palette, sponges, and beautiful, deeply pigmented colors.  I was so moved by wanting to use this kit that I began researching watercolor techniques on the Internet.  I stumbled upon a nice site with plenty of tutorials and tips.  I found the info on this site to be really helpful and decided to jump in.  So I grabbed an apple out of my fridge and set it on a table by the window.  The picture on the to is the result.  Later I decided to tackle more.... resulting in the picture on the bottom.
I have always struggled with watercolor.  After reading tips on this site I found my problem..... I didn’t know that you could watercolor in layers.  The texture found in my fruit was captured through layering paint.  Starting with the lightest colors and letting each layer dry before beginning the next.    I was pretty impressed with my first watercolors...  you see everything I do with art has been self-taught through research on the Internet.  Unfortunately, I have never had the opportunity of having a great art teacher.  Hopefully seeing that I can teach myself, will inspire you to bring out your inner artist!